August 23, 2008
Made the decision to tackle an electric vehicle project and started the research for an appropriate
chassis. Initially, I felt that it was important to select a car that I would like to drive such as
a Porsche or other sports car but
after doing some research I learned that certain cars were easier to convert than others. Therefore
I decided to do a Chevy S-10 pickup or a Ford Ranger pickup based on them being an easier conversion.
I began the search for an appropriate chassis.
September 6, 2008
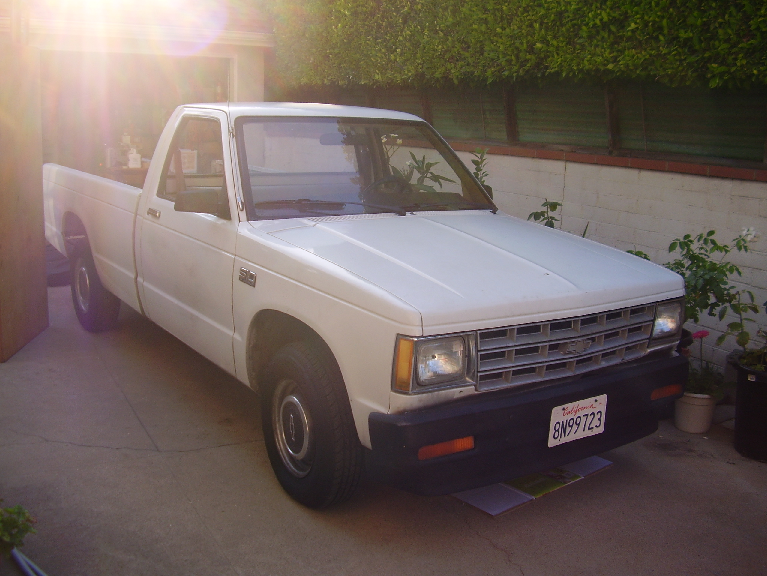
I bought a well used 1985 Chevy S-10 pickup today. It has over 270,000 miles on it and it currently
runs reasonably well so I know the brakes, steering, drive and electrical systems are all working
properly. I drove the car to a weigh station and had it weighed: 2,860 pounds. I drove it around
a bit to use up the gas in the tank and borrowed an engine hoist from a friend since I had a pickup
truck I could use to carry it. I placed an ad on Craigslist to sell the engine, radiator,
gas tank, fuel pump and exhaust system.
September 13, 2008
Started disconnecting the various engine connections. Started with the radiator hoses and removed the
fan, radiator shroud and radiator. Throughout the next week, I removed all the other engine
wires, unbolted the engine mounts and transmission mount. I disconnected and removed the
drive shafts. Yes, this truck has a two piece drive shaft.
September 20, 2008
Everything seemed to be ready so I enlisted the help of my wife and young son and started to
pull the engine. Since the transmission and bellhousing are one unit I planned to pull the engine
with the transmission attached. I discovered after some wrangling that the engine and transmission
were not going to come out until I removed the transmission crossmember from under the car. After
a little break for that task the engine came out pretty easily with just a little bit of
wiggling around. I only forgot one wire which snapped when I removed the engine but it won't
be needed anyway.
October, 2008
After pulling the engine and transmission I separated the engine and transmission and started
the task of cleaning years of oil and road grime build up. I cleaned up the transmission and
bellhousing first since I would be reusing it. Then I cleaned up the engine compartment.
With a car this old there was a thick build up of leaked oil and transmission grease coating
the frame, crossmembers, steering gear, firewall and underside of the cab as well as all
wires, hoses and linkages. This will probably be the least fun part of the project but
it has to be done otherwise all the new components will just get covered with greasy grime.
I used a paint scraper to scrape off the thickest buildups and then spray Gunk Engine Bright
as a degreaser. I used a brush to work the Gunk into the grease and then wiped off the mess
with paper shop towels. Most areas were protected from rust by the layer of grease, but in
areas that had any rust I brushed it off with wire wheel to make sure there was no serious
rust on any structural members. I finished by wiping everything with lacquer thinner and then
painted using a special paint that adheres to rust.
The biggest problem I have and one that still remains at this point is the firewall near the
brake system. I removed the clutch master cylinder which was apparently leaking and the paint
is all corroded on the firewall. The brake lines, speedo cable, steering, accelerator cable and primary
wiring from the back of the fuse panel are all located near here and there is no room to work
to clean off the firewall and repaint it. This is going to be a challenge.
November 3, 2008
I ordered the electric motor. Of course they are out of stock. Hopefully it will ship next week
and will require a week to arrive. So I have two more weekends to continue cleaning the chassis.
November 8, 2008
I used the engine hoist again to remove the pickup bed from the frame. I neglected to make a plan
where to set the pickup bed after it was removed and I bent the sheet metal slightly when I set it down.
That was dumb. I removed the gas tank once
the pickup bed was removed and siphoned the remaining gasoline. Waiting until now to remove the gas
tank made this task much easier. I started cleaning the rust and
caked on dirt from the frame and inspected for any damage or deep rust. I painted the newly cleaned
parts of the frame with the special rust proofing paint I bought.
November 13, 2008
Had a nice talk with "Craig" in technical support at Trojan Battery Company. He answered
several lingering questions I had about batteries and he confirmed that the Trojan T-145
is the best battery for this electric vehicle application. Thanks Craig! Visit the
Trojan Battery Company
when you get to the point of selecting batteries for your battery project.
November 21, 2008
The motor, adapter and coupler all arrived today. Now the real fun begins.
November 24, 2008
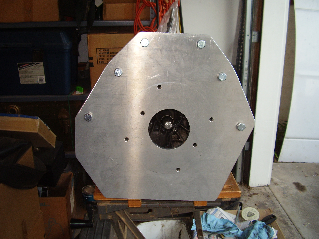
Over the past couple of days, I started machining the adapter plate to match the transmission. I
drilled the first six holes, cut off the end of the transmission input shaft and removed some of
the excess metal on the adapter plate. Thanks to Gary for lending me his tools. The right tools
really make the job easier. It looks like this now:
November 29, 2008
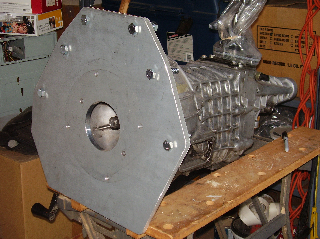
Yay! I installed the motor today. I was able to do the final assembly of the coupling and the adapter
yesterday and I played around to find the best place to attach the engine hoist so the motor/transmission
assembly would tilt into place during installation. It went in without a problem. I took a brief
video of the process and I'll post it on YouTube. It's not very exciting but this is an important
milestone.
|
|